 Il y a une traduction fran√Іaise de ce didacticiel.
 Animation sketchs are done with Inkscape and assembled with Gimp GAP animation plugin.
With Inkscape :

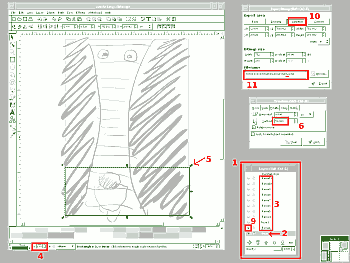
* Use layers manager(menu Layers=>Layers… (CTRL+SHIFT+L)) for this work 1.
* The first Inkscape layer is used for background (¬Ђ d√©cor ¬ї in screenshot). 2
* Next, one layer is added for each sketched step3.
* Layers are used as onionskin (layer opacity can be set at the left bottom of the document window, between active color and layer name (défault is o : 1,00)).4
* When animation is finished, an empty rectangle with border is added as caméra view, it will be selected until the end to work easier.5
* At each frame, the rectangle is moved with transformation tool (menu Objext=>Transform), vertical move here.6
* at each animation step, layer is activated by opening eye in the Layers window (others are hidden by closing layers eyes).9
* The picture is saved by using menu File=>Export bitmap…, choosing selection option in the export bitmap dialog window.10
* Give filename containing several numbers used to save each frame (Here, I used marche1.xx.png where xx run from 01 to 18).11
We can now use Gimp :
* First step file is opened ( marche.01.png in my case).
* Then go to menu Video=>Frames flatten… Every frames containing same numbering scheme that first one, will be automagically flatened.
Et voila on, everything is ready for output an animation.
Fro outputing an animated gif, I do:
* menu VIdeo=>Frames to Image….
* Size of picture followed by number of color can eventually be reduced to reducs gif file size (I used 4 black and white colors here).
* From flatened multilayer picture created, it left to do File=Save as… (gif format), then to choose animation. I set 250 milliseconds for each frame to obtain 4 frames by second.
