 Il y a aussi une version française.

The object of this tutorial is to analyse a method to draw a freehand illustration with Inkscape. With classical occidental method: sketching, inking, coloring.
That’s always better to do a first sketch or constructed sketch to have a really clean drawing.
Two good means for that are to draw on paper with pencil, then scan and import in inkscape the bitmap, or to drawing it directly, with a good graphic tablet training, or a very high mouse skill ;).

The default layer is named « Layer 1 » in Inkscape, as written at the left bottom of main window, just at the right of the eye and lock. That’s not a bad idea to rename it for example sketch or rough or wathever you want. As french, I named it « crayonné » meaning done using pencil (crayon in french). For rename it do in menu Layer=>Rename Layer
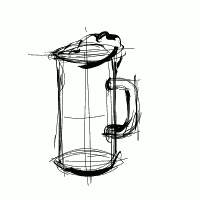
In this case, I choose to draw the sketch on Inkscape, on the draw, I keep construction strokes.
For example, for a cylender :
- One vertical stroke (centre)
- Two parallel stroke at equal distance from the centre (sides)
- Two horizontal strokes, at top and bottom.
- One ellipse by horizontal stroke that look like the hole at top of the glass, and it’s bottom
- Reuse this kind of method to do the other parts, lot of tutorials on drawing already exists on the web, or libraries.
On most of drawing, (sketch + ink + color), the inking step follow.
Create a new layer is not a bad habit for each step. There are some easy help on managing object that are on same layers, as (CTRL+A) that select all object onn only one layer, this can help to change style (color/and other) for every objects on a layer.
We already have the sketching layer, that I named « crayonné ». We add « Ink » layer (I named it in french, « Encrage » (that is a term used specificly to describe the step to add ink on a pencil sketch).

- Menu
Layer=>Add layer... - Enter the name (« Ink » for example).
- The new layer is selected as seen in the bottom of Inkscape main window, lookin like the right picture.

I prefer the  « calligraphy tool » (
CTRL+F6) for this step, giving a more living stroke, with varying stroke width. This is really good with graphic tablet support, and pressure/tilt informations.  « draw freeand »(
F6) is good too for drawing fixed stroke size, as a tubular pen.
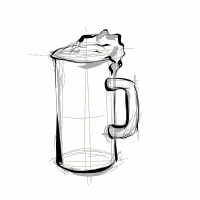
With selected tool, draw on top of the sketch, when the sketch was done, I change the style from black to gray, like onionskin technique in animation. Thís enhance the vísibility of the final drawing. The result is the picture at the right.
Inking is done, you can disable sketch layer visibility by selecting it, at the bottom of the main Inkscape window, and clicking on the eye, that will  close as layer become invisible..
We can kept the drawing like this, or color it….
(sorry to write this kind of stupid and evident statement ;) )
As in previous step, add a new layer (Menu Layer=>Add layer...), we can name it « color », I named it « Coloriage » (action of adding color in french).
This layer must be at the buttom of layer stack, for seeing the whole ink drawing (eventually under the sketch).
- To put down the layer, just use the menu
Layer=>Lower layer. - Or to put at the bottom of the layer stack, on the menu :
Layer=>Layer to bottom....
For the coloring, there are a lot of method, the 2 most used methodes are using calligraphic tool as a brush to fill colors, ot to fill big zone, selected with  freehand tool (
F6). It is a good to first fill with freehand large part, and add fine calligraphique painting touchs.
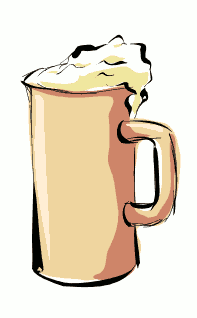
For fast coloring of this drawing, I used the method I used in most cases until now :
- Quickly drawing shape with draw freehand tool.
- Modifying the color with Menu Object=>Fill and stroke…
Stroke painttab : X (No paint)Fill tab=>flat color, then choosing color on wheel/triangle.
I eventually made hole on this shape (as the hole of the hand) by :
- drawing hole with draw freenhand tool
- selecting it, then press SHIFT, and select the to cut shape (two shapes are then selected)
- Menu
Path=>Difference (CTRL+-)
The node can eventually be adjusted to have a more clean color shape. I prefer to keep a more natural one.
Et voilà ! There is only to export as bitmap for use everywhere as in this tutorial or to save in SVG(z) to have this.


very good tutorial for illustration’s basics in Inkscape :)
Commentaire par cornelius — %PM %Europe/Paris %884 %2005 @ %22:%Sep
Hey dude,
Nice tutorial, thanks for doing this!
Love
anj
Commentaire par anj — %PM %Europe/Paris %609 %2006 @ %15:%Jun