=>

The goal of this tutorial, is to quickly colorize a drawing to use in animation:
This page is for advanced gimp user, something could be to hard for beginers, look first at The Gimp documentation or here in this case.
|
=> |
|
The usualy described method for colorisation (gouacher) a rough scan b&w give me some practical problemes for an object to animate. I use this method to colorize, but convert it using method described in this tutorial for animation.
|
WARNING!!! The resulting pictures are in PNG picture format with several transparency level, for your test usage. If you are using Microsoft Internet Explorer, you should have got some hugly picture. Use any other web browser instead, as Mozilla or Firefox this could protect you from some virus and security hole too, for waiting for a Microsoft correction in few centuries ;). Any graphic software will display it correctly. |
The method is to:
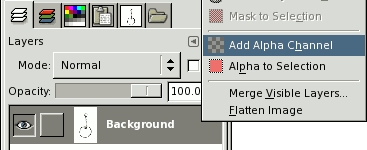
Add an alpha channel
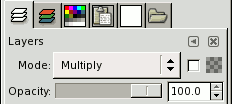
Change the layer mode to multiply.
and add lower layers for colorization.
The probleme with this method is than for animation purpose, several objects have to be moved. In this case, it's easier and less ressource expansive to have the whole picture in only one layer. It's better for import in other softwares too.
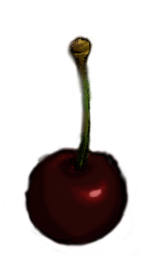
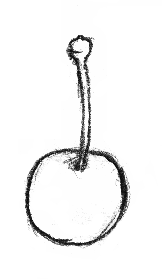
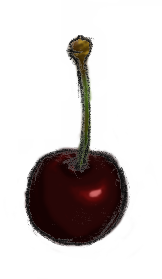
We can see in left picture, than if the drawing (in multiply mode) and color layers are merged some parts of drawing loose, this cherry seem to have strange shape. This is most displayed with strong contrasts. For explaination purpose, right picture is before merging.
This bug come from that fact than with a colored background, we see every drawings by multiply, but when we merge with multiply, if the lowest layer have got transparent picels, the corresponding drawing pixels are destroyed. Drawing pixel by pixel the whole drawing in color layer would be too much work.
I tried several things to find good method, and find an easily one:
At least of use multiply mode, the trick is the following:First add a Layer Mask on drawing layer (changed to normal mode)
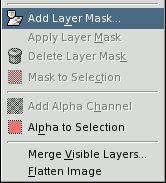
window menu or right button:Layer->Mask->Add Layer Maskor windowDialogs Layers:left button->Add Layer Mask

Select :Grayscale Copy of Layerand check the box :Invert Mask

We can see the picture in inverted color in a new box with white border, at the right of the thumbnail of the picture.
We have got an interesting result (at left), but this is not totaly perfect, we can see gray areas (that's a little dirty) and some ligthers drawings area disappear. This could be interesting for some kind of work, but not for all.
Then, to have the same rendering than with the multiply layer, I had to find another solution, I tried by darkening picture with several methods (threeshold, contraste, curves...) before creating the mask, but that was too much complex and didn't given the good result.
I finally got the solution:

Select the picture (not the layer mask), by clicking on, in the Layers Dialog
| Warning, the picture has to have got a white border like in this picture, the mask a black one. |
Select the whole picture (menu: Select->All (ou ctrl+A))
Then fill with black
Select black color as ink.
Then fill,menu:Edit->Fill with FG Color(ouctrl+,).
The result is identical to multriply mode merged with background (I made a comparison pixel by pixel in zoomed view) and the drawing and color merge is perfect. You can drag'n'drop this picture from your browser to The Gimp tools window for testing.